Media
Media can be:
- Images, in Jpeg or Png format
- Office files, Microsoft Office, OpenOffice, LibreOffice
- Pdf files (Acrobat Reader)
- Video or audio files
- Sheets, including formatted text and images
- Embedded videos or other embedded objects
- SCORM 2004
Some of these media types deserve clarification:
Images
Images can be integrated into the media library in various ways:
- From the media page, by clicking on NEW MEDIA and selecting one or more files from your workstation
- When creating/editing a question, by uploading a file from your machine
- When creating/editing a question, by performing a Google image search and selecting the image of your choice. Be careful to respect the reproduction conditions of the selected images
- By importing a question file in docx format, all images illustrating the questions from the file will be imported into the media library
Only Jpeg and Png formats are accepted.
All images imported into the media library are processed and resized into various formats:
- XL size: fits in a square of 800 x 800
- LG size: fits in a square of 400 x 400
- STD size: fits in a square of 250 x 250
- SM size: fits in a square of 150 x 150
- XS size: fits in a square of 75 x 75
When you want to illustrate a question with an image, you can click on the image symbol to the right of the question or an answer – reference [1] on the image:
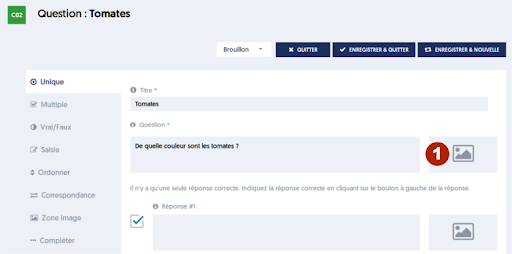
A media library panel opens on the right, which allows you to select an image from the existing ones or to upload a new image.
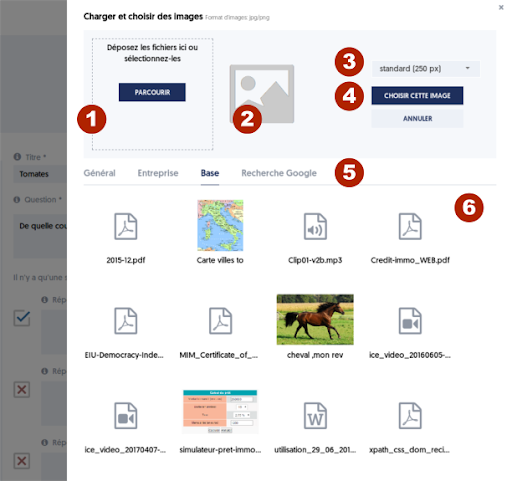
The tools and features of the media library panel are as follows:
- [1] Select and upload a file from your machine. You can either click on the BROWSE button and search for the file in your directory, or drop your file by drag-and-drop from the file explorer
- [2] Preview of the file, particularly the image, before validation
- [3] Choice of the image size to use (see above for the different formats)
- [4] Validate the choice of image or media
- [5] Tabs allowing browsing through different folders of your media library, or access to the image search function
- [6] Content of the folder, with the various available media
Videos
You can add videos to your media library, to use them as support for a question, an explanation, or a course reminder, as well as in educational content associated with a training or an e-learning module. Like other media, videos can also be made visible to certain user groups.
There are two ways to integrate videos into the media library:
- Direct use of a video file, which we will call native video;
- Use of embedded videos, hosted on a specialized site.
Let's take a closer look at each mode:
Native Videos
You have a video file on your workstation and you upload it to ExperQuiz, just as you would for an image file or a document.
In this case, the video file will be delivered to your users as it was uploaded, without any transformation.
This method for managing videos is not recommended for several reasons:
- There is a upload size limit of 32 megabytes. For most types of media, this is rarely reached, but for videos, it can be.
- Web browsers (Firefox, Safari, Chrome, Internet Explorer) do not support all the same video formats, and there is no format that is certainly supported by all browsers. To use native videos, you would need to be sure of the browser used by your users.
- Native playback of the video does not allow for adapting the quality to the target screen, whereas it may be unnecessary to stream an HD video on a mobile screen format.
For all these reasons, we recommend using embedded videos instead.
Embedded Videos
This management method consists of hosting your videos on a specialized video hosting site, such as Vimeo, DailyMotion, or YouTube.
For example, Vimeo allows you to host a large number of videos for a subscription of €6 per month, and to control in detail both access permissions to your video and the viewing options.
For professional use, it is important that the hosting site does not offer links to other videos that may be a harmful distraction for your users once the video is finished.
Once your videos are uploaded to the hosting site, you just need to copy-paste a small piece of text that will allow you to use a video within ExperQuiz.
Let's consider, for example, embedding a video hosted on Vimeo.
After you have uploaded your video, you can access a settings page:
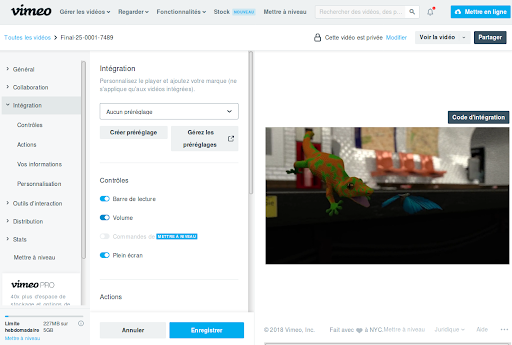
On this page, you can define in particular:
- Under which conditions the video can be played; for example, you can restrict visibility to integration within ExperQuiz
- The options of the video player, which is the interface for viewing the video
Once you've configured this, click on the Embed Code button.
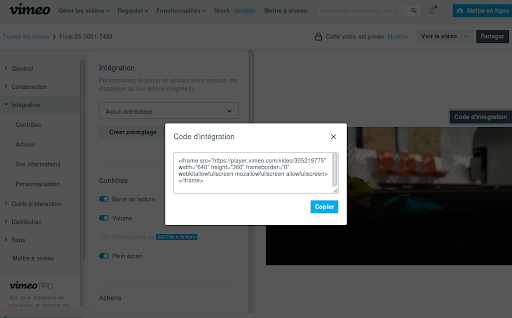
Click the Copy button to copy this small piece of text into the clipboard so you can paste it into ExperQuiz. It is not necessary to understand what this text means, just copy and paste it.
On the ExperQuiz side, go to the Media Library page and click the NEW EMBEDDED VIDEO button. A panel opens on the right to define the new video.
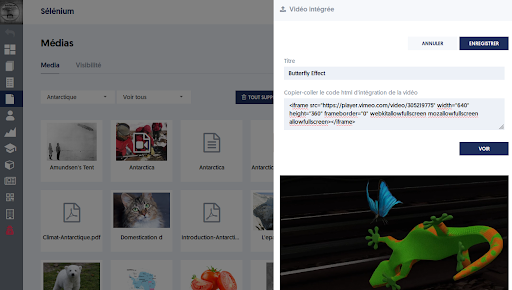
Give your video a title, then paste the previously copied text.
You can click the VIEW button to ensure that the video plays correctly and that the video player is as desired.
The video is now available in your media library, and you can use it in questions, training, or e-learning modules.
Sheets
A sheet is a text, usually between a few lines and a full page, which can include formatting and images.
A sheet can be used like any other media: associated with a question, as educational support for a training or a module.
A characteristic use is that of course reminders. Several questions can relate to the same course point. In this case, rather than copying the same text into the reminder field of several questions, you can create a sheet and integrate it as a reminder for all the questions that use it. If you need to modify this sheet, the change will automatically impact all questions.
To create a sheet, on the Media Library page, click the NEW SHEET button. A panel opens on the right to allow you to fill in the sheet.
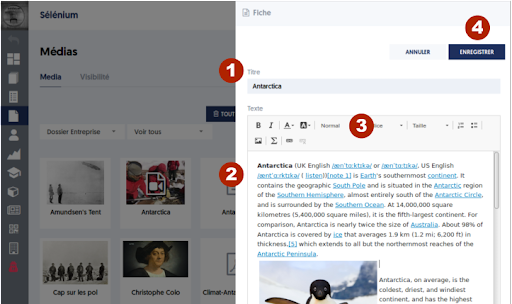
Give your sheet a title (reference [1]), then enter the text (reference [2]).
You can use all the formatting tools in the toolbar (reference [3]): bold, italic, text color, background color, style, font, size, numbered list, bullet list, image insertion, mathematical formula insertion, hyperlink insertion.
Note that you can do a copy-paste of formatted text, whether from Word or a web page.
By clicking on the image insertion button, a window opens that allows you to navigate in the media library to choose an existing image.
Resources that can be integrated like videos: Prezi, H5P.org, etc.
Many resources from the web can be integrated like a video, for example, Prezi presentations or interactive content from H5P.org.
On the ExperQuiz side, integration is extremely simple: just do as for the videos and copy-paste the embedding text from the originating site.
Office and PDF files
You can also place office files (MS Office or Libre Office) or PDFs in the media library.
These files will be delivered to users as they were uploaded. Therefore, for users to visualize a PowerPoint file (pptx), they will need to have software that can read this format on their workstation.
In many cases, it will be preferable to use a PDF version of office files so that they can be viewed on as many devices as possible.
Defining the visibility of media
Like questionnaires, media can be shared with users, either with all users in your company or with users from only certain groups.
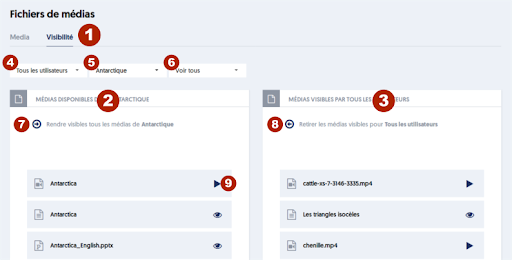
To manage the visibility of media, go to the Media page, and on the Visibility tab (reference [1]).
To make certain media visible to all users, the procedure is as follows:
- Using the [4] selector, choose “all users”
- In the right column [3], the media visible to all users will appear
- Using the [5] selector, select one of the folders in the media library. The left column [2] presents the media in this folder
- You can use the [6] selector to filter the content of the folder and only present media of a certain type
- By dragging and dropping, you can move media and arrange them in the appropriate column
- Using the [7] and [8] buttons, you can toggle all media from one column to another
- Using the buttons on the right side of each media, you can preview the media
To make certain media visible to users from a certain group, proceed as follows:
- Using the [4] selector, choose the concerned group
- In the right column [3], the media visible to users belonging to this group will appear
- Do as before, placing the media in the appropriate column by drag-and-drop.
Note that on this page, there is no SAVE button; the saving is automatic and immediate.