List of Surveys
By clicking on the "Surveys" option in the main menu, you reach the page listing your surveys, which appears as follows:
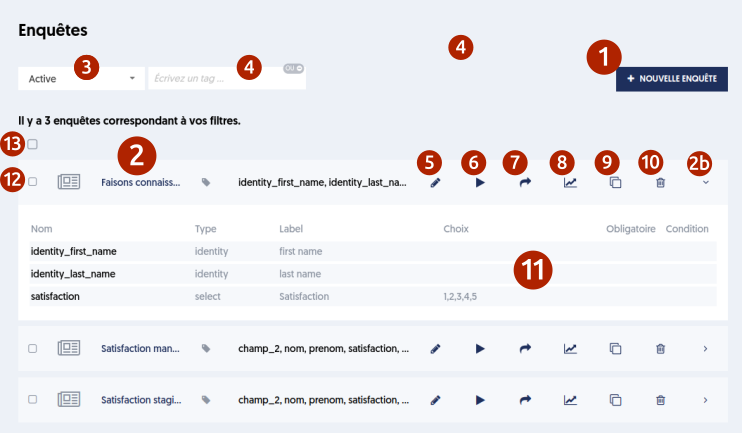
Survey list page and its various components
Here are the different elements of this page:
Button [1] allows you to create a new survey. We will see the creation process later.
The area [2] contains the list of surveys already defined, each with its name, any tags, the beginning of the list of fields, and various action buttons. To the right of the line, as always, button [2b] opens a detail panel [11].
In [3], you have a filter based on the status criterion, with the values: active, archived, or all surveys. This filter is only presented if you have enabled the archiving management feature.
Similarly, in [4], you can have a tag filter, if you have activated this option. You can enter tags in this filter, and only the surveys with these tags will be displayed. As always with tag filters, you can specify whether the surveys must have all specified tags or at least one of the specified tags.
Now let’s look at the available action buttons for each survey:
[5] Edit the survey form. [6] Test the survey. This allows you to view it as if it were submitted by a user and to see how the entries will be managed. [7] Send invitations. This involves inviting participants, users, or contacts to respond to this survey. We will explore this feature further. [8] Access the results, which means visualizing all user entries in response to this survey. [9] Duplicate the survey. This allows you to create a new survey that is a copy of this one. The new survey will have a name derived from this survey's name, with a copy number in parentheses. [10] Delete the survey. Be careful, if you delete the survey you will no longer be able to view the results associated with this survey. You might instead consider archiving this survey, which does not delete anything but allows you to hide the survey in the list.
[2b] And finally, as we saw earlier, the button on the right allows you to expand or collapse the detail panel [11]. In this panel, you can directly view the list of fields that make up the survey form and their main characteristics.
You can also select one or more surveys to apply an action to them. As everywhere else, you can use the checkboxes [12] located to the left of each line, or the general selection box [13]. When boxes are checked, new buttons appear. Here, the only possible action is archiving or unarchiving the selected surveys.

Action buttons when surveys are selected