User Creation
There are four ways to create ExperQuiz users in your company:
- Create a user by filling out a web form and then activate the account.
- Send simple invitations to people, who will create their own account on ExperQuiz.
- Import a set of users from an Excel file.
- Create users using APIs or SSO.
Creating a user via the web
On the Users page, and in the users tab, click on the NEW USER button. A creation form will be displayed.
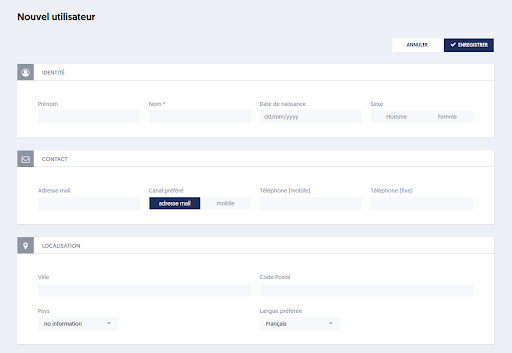
We will not detail each of the fields in this form, as many of them are optional.
The only required fields are:
- User name
- Email address or mobile number
- Preferred channel: email or mobile. This indicates whether messages intended for this person should be sent by email or SMS.
- Preferred language: by default, this will be the current user's language.
- User type: by default, the type is collaborator.
- Rights: by default, the user has no special rights.
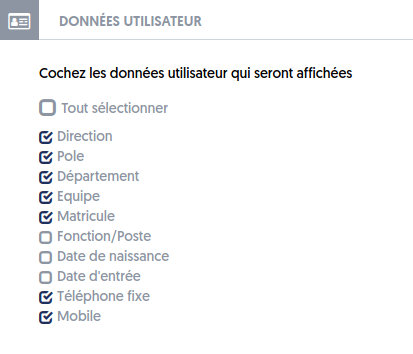
Note that some of the information fields that characterize your users depend on options you have chosen for your company. At the company options level, you can specify the information fields you want to use:
When you submit the creation form, the user is in a created status. They have not been informed, have not received a password, and therefore cannot log in.
We will see later how to activate the created accounts.
Creating a user by simple invitation
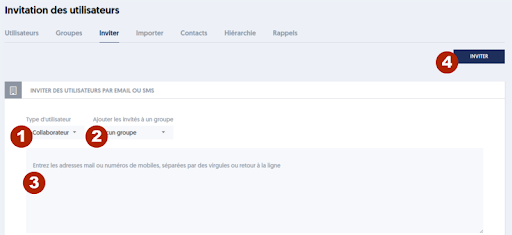
- Marker [1] – Indicate the type of user to be assigned to the invited users.
- Marker [2] – Optionally, specify a user group to which the invited users will be assigned.
- Marker [3] – Enter, or copy-paste, a list of either email addresses or mobile numbers, separated by commas or line breaks.
- Marker [4] – Click on the INVITE button.
The concerned individuals will receive an invitation, either by email or SMS. The invitation will include a link that provides access to the registration page, where they will enter their first name, last name, and password. The users will be automatically associated with your company.
Creation by importing an Excel file
You can create a set of users by importing an Excel file, which will contain one line per user.
To do this, go to the Import tab on the Users page.
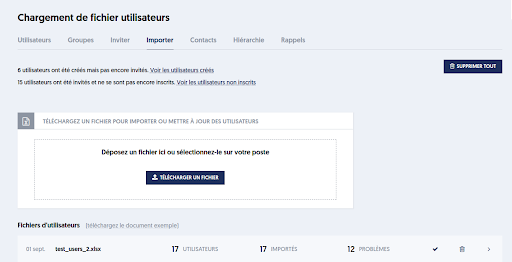
You can download a sample document, which will give you all the instructions for constructing your file in xlsx format.
Select a file on your workstation: you can either drag and drop into the dotted area, or click on the UPLOAD A FILE button and select it.
Importing via an Excel sheet can be used both to create new users and to update existing users.
The file formatting rules are as follows:
- The first row of the sheet contains column headers that identify the data (attribute) present in the column.
- There may be attributes that are not known to ExperQuiz; this will not block the import.
- The subsequent rows contain the data, one row per user.
- Most attributes are optional; the only required attributes are: name, email, and type.
- When writing titles (attributes), accents are ignored, and spaces will be replaced with underscores. You can write either "preferred channel" or "preferred_channel."
- Numerous checks will be performed by the import process, and all encountered issues will be reported.
- The checks include: presence of required attributes, attributes present more than once, incorrect type or invalid value attributes, etc.
- At the end of the import process, newly created users will have the status 'created'. You will still need to activate them so they can log in and use ExperQuiz.
- When you import users, if a user exists in your organization with the same email address, mobile number, or employee_id, then the existing user will be updated with the new data.
- Groups mentioned in the ‘groups’ column that do not yet exist will be created.
- Groups mentioned in the ‘authorized groups’ column that do not yet exist will not be created.
- The import process is asynchronous, meaning it will run in the background while you can continue to work on ExperQuiz.
- If you import several hundred users, the process may take a few minutes to complete.
- The user import page will show you the import progress as a percentage.
- Some attributes have aliases, which are alternative names. The sample file indicates the aliases corresponding to the French terms.
In the sample document, the second tab presents a summary of the column titles you can use. Only 3 columns are truly required: last_name (name), email (email_address), and user_type (type).
The uploaded file is analyzed asynchronously; for a large number of users, processing may take several tens of seconds. Refresh the page to see the processing progress. When the processing is complete, if there were incidents, they will be reported in the “XX problems” box, and you can view the details of the problems by clicking the button on the right that opens a detail pane. In some cases, the incidents are minor and did not block the import or update of users. In the case of more serious incidents, the import is canceled. After analyzing the errors, correct your file and try again.
Once the file is processed, the new users will be created in the created status. As we saw for creation via the web, you will still need to activate their accounts for them to be active.