Additional Input Field Options
When you click on the [8] button in the previous figure, a panel appears on the right allowing you to specify additional parameters for the field. These parameters depend in part on the type of field they relate to.
For example, for a text-type field, the panel is presented as follows:
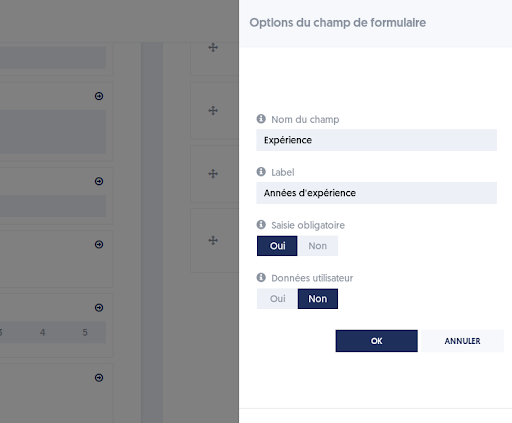
The label has been carried over from your previous input. The name of the field is, by default, equal to the label or if the label is very long, to the first characters of the label.
The distinction is as follows:
- The label is what will be displayed just above the input field to explain to the user what is expected.
- The name of the field is what will identify the field in the input retrieval.
The two can be equal when the label is short.
You can indicate whether the input for this field is mandatory or not.
The user data option deserves further explanation. In the data retrieval, fields that have been marked as user data will be presented inline, to the left of the tables, like the first name and last name, meaning that these are data considered to contribute to identifying the user. We will see later that data collection forms can be used in the case of public questionnaires, where the user's first and last names are not known.
The following image corresponds to the parameters of a selector type field:
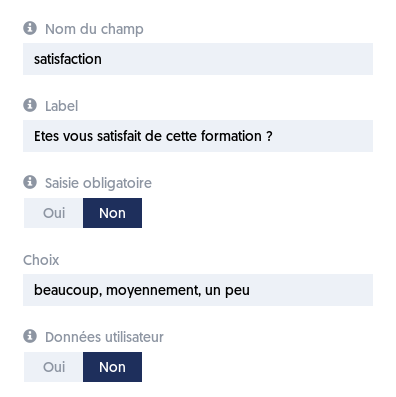
You will notice a new parameter titled Choices, which allows you to define the options of the selector in the form of a series of words separated by commas.
Other field settings
Depending on the field type, the panel can also offer the following settings:
- Validation applies a specific validation rule to the value entered.
- Identity attribute associates the value with an item of user profile data. When the respondent enters a new value, it updates the corresponding profile data.
- Minimum length and Maximum length set the permitted size of a text entry.
- Convert to number converts a selected choice to a numeric value. By default, choices are numbered from 1 onwards; you can give a choice an explicit value by adding it in parentheses, for example
Very satisfied (5). - Convert to mood level, with AI analyses the entered text and adds a new result field containing a mood value from 1 (not happy) to 5 (very happy).
Displaying a field conditionally
The Condition setting displays a field only when a condition based on another field is met. It can therefore be used to create follow-up questions without displaying them to every respondent.
Use the field's name, not its label, in the condition. Field names must be unique in the form.
The basic syntax is:
field_name == value
field_name != value
== means “equal to” and != means “different from”. Conditions can be combined with and, or, and parentheses:
(country == "United Kingdom" or city == Paris) and job != "project manager"
For a selector, dropdown list, or multiple-choice field, you can refer to a choice by its position, preceded by #:
country == #2
This is useful when choice labels are long or may change. It is mandatory when the referenced field's choices are converted to numbers.
For a multiple-choice field, == is true when the indicated choice is among the selected choices; != is true when it is not selected. Place the field on which the condition depends before the conditional field, then test the survey after saving it.
Article Navigation
Previous Previous Article: Selection of the fields making up the form
Next Next Article: Associating a survey with a questionnaire